# Survive The Undead Strategy Guide
Survive The Undead (STU) is a community-made PvE mode in Halo Infinite where a group of 4 players fight against increasingly difficult waves of AI using items and powerups purchased with points. This guide explains how to reach high scores and survive for longer in the mode.
* [Mode](https://www.unggoy.xyz/modes/6254af4b-c175-49aa-9991-77943b7fca01)
* [Maps](https://www.unggoy.xyz/browse?assetKind=Map\&gamertag=I%20EliteFalcon%20I\&searchTerm=of%20the)
## Progression from Gameplay Start
Succeeding in a match of Survive The Undead is based a lot on the decisions you make early on so you can have a solid loadout for later and survive. Follow this step-by-step progression to always have a good chance of getting a high-score match.
### Opening
1. Only melee enemies for the two first rounds to conserve ammo.
* Melee with the Mk50 Sidekick for faster melees.
* If players steal your kills, shoot the enemies with the Mk50 Sidekick.
* Much more enemies will come at wave 4, where you can start to gather some points back if you didn't get much in the first 3.
2. Purchase Damage 2/4 and Health 4/4 immediately when you have enough points.
* Health 4/4 gives health vampirism from dealt damage and is crucial in later waves.
3. Save all remaining points until wave 6 (first Berserker Brutes) is complete.
* Use the Mk50 Sidekick until it's empty. There should be no need to buy Max Ammo up to this point if you've followed the steps.
### Midgame
1. Spend points on the Mystery Box 3 times and try to get an "endgame" or "ideal" base weapon.
* List of all obtainable weapons from the Mystery Box in the preferred order with the ideal base weapons being highlighted:
* Heatwave
* Pulse Carbine
* Plasma Pistol
* Mutilator
* Impact Commando
* Fuel Rod SPNKr
* Purging Shock Rifle
* Calcine Disruptor
* Arcane Sentinel Beam
* Backdraft Cindershot
* Cindershot
* Ravager
* VK78 Commando
* Stalker Rifle
* MA40 AR
* M41 SPNKr
* MLRS-2 Hydra
* Mangler
* Sentinel Beam
* Mk50 Sidekick
* S7 Flexfire
* S7 Sniper
* Skewer
* Energy Sword
* M392 Bandit
* Shock Rifle
* CQS48 Bulldog
* MA5K Avenger
* Disruptor
* Needler
* Activate the Mystery Box while holding the worst weapon in your inventory, as that will be replaced. The MA40 AR has more ammo and is a better secondary fallback.
* Replace weapons in the order shown in the list. The Mutilator and Impact Commando are the next best guns to keep ahold of if you don't get lucky with any of the endgame or ideal base weapons.
* If you don't get one of the endgame or ideal base weapons after 3 tries, jump to step 3.
2. Upgrade the endgame or ideal base weapon at the 2500-point machine and try to get one of the endgame or ideal weapons once.
* List of the endgame and ideal weapons (combos):
* Heatwave + Purging Shock Rifle
* Pulse Carbine + Scatterbound Heatwave
* Pulse Carbine + Convergence Bulldog
* Plasma Pistol + Scatterbound Heatwave
* Plasma Pistol + Convergence Bulldog
{% hint style="success" %}
**Temporary price decrease**
At the beginning of an intermission period after wave 6 has passed, a message displaying "1/x Price" can show up on a 25% chance. This makes all the purchasable items be a fraction of their price for 20 seconds. The available fractions are:
* 1/10 = a tenth of normal price
* 1/4 = a quarter of normal price
* 1/2 = half of normal price
When these are active and you're saving up to purchase something, it's recommended to go for the most expensive option first such as taking a chance at the 2500-point weapon upgrade or getting the maximum speed upgrade.
{% endhint %}
3. Purchase Damage 4/4
4. If you don't have any of the endgame or ideal base weapons, jump to step 1.
5. Purchase the Repulsor equipment.
* Allows you to push enemies away from you as well as escape tight situations by jumping over enemies on the maps that allow it.
6. Purchase Speed 4/4
7. If you don't have any of the endgame or ideal weapons (combos), jump to step 2.
{% hint style="info" %}
Purchase Max Ammo when about to run out of ammo.
{% endhint %}
#### Price decrease good weapon purchase strategy
If a temporary price decrease of 1/4 or 1/10 appears before you have at least one ideal weapon, immediately purchase a Disruptor or M392 Bandit off the wall–favoring the Disruptor–, and attempt upgrading it to get an "[alternative good weapon](#alternative-good-weapons)". These can substitute an [ideal weapon](#ideal-weapons-excluding-endgame) until you get an [endgame weapon](#endgame-items).
### Endgame
1. After wave 13 at the latest, Spend all your accumulated points on the Mystery Box and try to get an endgame base weapon (Heatwave / Pulse Carbine) depending on which ones you are missing. The first goal is to have both of them.
* Activate the Mystery Box while holding the worst weapon in your inventory, as that will be replaced.
* Keep trying until you get either one of the endgame base weapons. If you don't already have an endgame weapon, don't attempt to get both yet.
2. Upgrade the endgame base weapon at the 2500-point machine and try to get these combos:
* Pulse Carbine + Scatterbound Heatwave
* Heatwave + Purging Shock Rifle
3. If you don't have both of the endgame weapons, jump to step 1.
4. During intermission, purchase max ammo.
5. Purchase the Repulsor equipment back if it has been used up.
{% hint style="success" %}
This loadout is the "**endgame loadout**". You've achieved it if you have nothing more to spend your points on except more ammo, potential revives, repulsors and point shares. You should have the Heatwave + Purging Shock Rifle and Pulse Carbine + Scatterbound Heatwave combo weapons, max perks and a Repulsor.
{% endhint %}
#### Endgame round strategy
1. Save a Nuke powerup at the end of the previous intermission and pick it up after the Black Eye skull gets enabled.
* This will kill the Escharums that spawn at the beginning which are the biggest threat.
2. Always pick up Nuke powerups after the Black Eye skull gets enabled unless the round is about to end as you want to save it for the start of the next round for step 1.
3. Pick up Insta Kill powerups if there are still Escharums alive or you feel the need to help your teammates get faster kills.
* Be aware of the [negative effects the Insta Kill powerup has on health vampirism](#insta-kill-caution).
4. Pay attention to your ammo count and purchase Max Ammo when required.
5. Revive dead teammates if you need overshield quickly.
## Reviving
Info about when to revive teammates for the best results depending on the situation in the game.
### Reviving general
Only revive teammates if you have the Endgame loadout and points to spare, or if you need a health boost. As revived teammates get 30 seconds of 4x damage resistance, attempt to revive teammates 30 seconds before the round ends so they get extra time for gaining back their loadout.
* Reviving a teammate gives the reviver full health and half Overshield, which can save them in some tight situations.
* Teammates get revived automatically after a round has ended where they can also start getting their loadout back with no enemies attacking them.
* Usually it's very difficult for a teammate to build back their loadout when there's enemies attacking them, even when they have a 4x damage resistance trait for 30 seconds after spawning.
### Getting teammates up to speed again
If you or a teammate is revived, follow these steps to get the revived player back up to a state where they can contribute to the match. Keep in mind, it is very difficult to achieve this in later waves.
#### Before reviving
Make sure to share points to your teammates with the 2000-point share interface so they have a minimum of 5400 points saved up. And preferably more, such as 10400. These points will be used up quickly to get perks and an upgraded weapon after being revived.
#### During the current round
1. Revive all teammates approximately 30 seconds before you predict the round to end. Reviving a teammate gives them 30 seconds of 4x damage resistance which should keep them alive even if enemies are attacking them. If they survive until the intermission, they've now gained extra time to gather back their loadout.
2. The revived players must purchase Health 4/4 and a 500-point Calcine Disruptor off the wall, and upgrade the Disruptor at the 2500-point machine trying to get the Disruptor + Volatile Skewer combo weapon. This is where the extra points will come in handy as there is only a 25% chance of getting the Volatile Skewer combination.
#### Intermission 1
1. Alive players with the endgame loadout must share all of their points on the 2000-point Point Share interface to give the revived players enough points for the next steps.
2. Revived players must get ready in the area where the endgame player will be holding off the enemies in.
#### During the next wave
1. The revived players must stay close to the endgame player and shoot at far away enemies with the explosive Disruptor to aid the team and to keep themselves healed using the vampirism of Health 4/4.
#### Intermission 2 onwards
1. Alive players with the endgame loadout should share all of their points on the 2000-point Point Share interface to give the revived players enough points for them to progress.
2. Revived players must do the [Midgame](#midgame) and [Endgame](#endgame) steps until they have the endgame loadout.
3. Revived players must get ready in the area where the endgame player will be holding off the enemies in if the revived players don't have the endgame loadout.
## General tips
General tips to help you understand how to play the mode better and more efficiently.
### Best weapons
#### Endgame items
**Heatwave + Purging Shock Rifle**
* Shoots a 5-projectile Purging Shock Rifle bolt 5 times per trigger pull.
* A single shot shocks and stuns multiple enemies, making them stationary for a short period, which buys you valuable time with a lot of enemies attacking.
{% hint style="warning" %}
Only three shots per magazine, so keep an eye out for when you need to reload.
{% endhint %}
**Pulse Carbine + Scatterbound Heatwave**
* Shoots a 5-projectile tracking Heatwave shot 5 times per trigger pull.
* Shoot the ground to activate the Heatwave shot tracking towards enemies. This is the main strategy to shooting with this weapon.
* Scatterbound Heatwave projectiles pass through enemies and bounce off walls, dealing damage to multiple enemies with a single burst.
{% hint style="danger" %}
The bouncing shots can damage and kill the shooter unexpectedly.
{% endhint %}
**Max perks**
* Damage 4/4
* Health 4/4
* Speed 4/4
**Repulsor equipment**
* Allows you to push enemies away from you as well as escape tight situations by jumping over enemies on the maps that allow it.
* 5 charges per purchase.
#### Ideal weapons
**Plasma Pistol + Scatterbound Heatwave**
* Scatterbound Heatwave projectiles pass through enemies and bounce off walls, dealing damage to multiple enemies with a single burst.
* Overheats if shot too fast, which is often necessary.
* 114 semi-auto shots instead of 125 burst-fire shots compared to the Pulse Carbine + Scatterbound Heatwave combo.
{% hint style="danger" %}
The bouncing shots can damage and kill the shooter unexpectedly.
{% endhint %}
**Pulse Carbine + Convergence Bulldog**
* Kills single enemies fast.
* Ammo doesn't last long.
* Doesn't keep up with the pace required at later waves.
**Plasma Pistol + Convergence Bulldog**
* Kills single enemies fast.
* Ammo doesn't last long.
* Overheats if shot too fast, which is often necessary.
* Doesn't keep up with the pace required at later waves.
#### Alternative good weapons
**Disruptor + Volatile Skewer**
* 48 exploding Skewer shots which can one-shot enemies even in later waves. 12 shots per magazine.
* A potentially very low investment as it can be purchased off the wall for only 500 points, making the only randomness be the 25% chance of getting the right combo at the 2500-point upgrade machine, but getting bad luck will leave you with a useless weapon.
* Can easily carry a whole team to wave 14 if used cautiously.
* A good weapon to purchase right after being revived to keep yourself alive.
{% hint style="danger" %}
**Explosive projectile caution**
Explosive projectiles such as the Skewer, Rockets or Calcine Disruptor shot can damage the player easily which will unintentionally kill you when the enemy count starts becoming higher and they start appearing next to you.
The explosion can be survived point-blank if the shooter has Health 4/4 as they will also regenerate health from the damage dealt. Any more than one explosion nearby will very quickly kill the shooter.
{% endhint %}
**M392 Bandit + Volatile Skewer**
* 45 exploding Skewer shots which can one-shot enemies even in later waves. 15 shots per magazine.
* A potentially very low investment as it can be purchased off the wall for only 200 points, making the only randomness be the 25% chance of getting the right combo at the 2500-point upgrade machine, but getting bad luck will leave you with a useless weapon.
* Can easily carry a whole team to wave 14 if used cautiously.
* A good weapon to purchase right after being revived to keep yourself alive.
**Mutilator**
* Extremely powerful melee blast when Cowbell and Boom skulls are enabled.
* Melee blast can kill any AI they get sent into a wall at a high enough speed.
{% hint style="danger" %}
**Lag caution**
The melee blast of the Mutilator creates effects which seem to not get cleaned up properly. Eventually after meleeing for too long, the map's performance will drop to an unplayable state so this weapon is not ideal for long games.
{% endhint %}
#### Safest weapon to upgrade
The **Pulse Carbine** is the safest weapon to upgrade as it has only three variants:
* Scatterbound Heatwave
* Convergence Bulldog
* Unbound Plasma Pistol
{% hint style="info" %}
Unbound Plasma Pistol being the only bad variant. This means if you get a Pulse Carbine, you need a minimum of 5000 points to guarantee an ideal weapon.
{% endhint %}
#### Last chance to get an ideal weapon
You can survive to about wave 14 (first Escharum) with the default loadout of Mk50 Sidekick and MA40 AR, full perks and a Repulsor. After that, the enemy count and difficulty will become too much for the default weapons to handle. So if by wave 14 you haven't had good luck with the Mystery Box on getting an ideal weapon, you might just be out of luck.
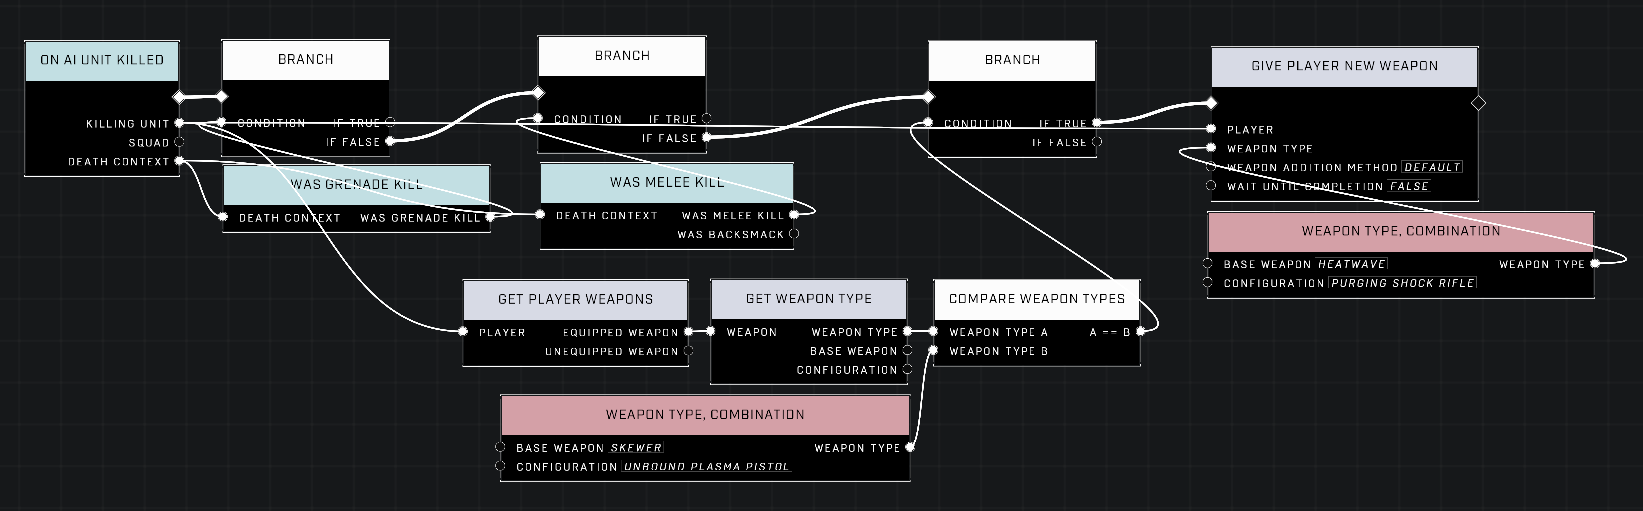
#### Secret best weapon grant
By getting a kill with the Skewer + Unbound Plasma Pistol, a Heatwave + Purging Shock Rifle combo will be given to the killer. This can only feasibly be achieved by getting the Insta Kill powerup and then getting a kill with the Skewer combo.
{% hint style="warning" %}
This should only be attempted if you already possess an ideal weapon, as otherwise it's too risky.
{% endhint %}
### Prioritize yourself first
Regardless if you're playing with a team or not, focus on getting your situation to the best and most reliable state before helping others. Be aware that when playing with a team, the player who gets a powerful weapon first may steal a lot of the kills and make it difficult for the rest of the team to gather points. In this case it may be necessary to share points to the rest of the team.
### Track your ammo
Don't let your ammo run out without you being aware of it.
* Keep track of your weapon's ammo count and purchase the Max Ammo if required. This will be a common strategy in later waves.
* Weapon ammo will be refilled after boss waves (3, 6, 9 & 12).
* Upgrading a weapon grants 40 seconds of unlimited ammo.
### Insta Kill caution
The Insta Kill powerup will set all enemy health counts to 1% for 30 seconds, but this has a negative impact on health vampirism. As the health vampirism that comes with the Health 4/4 perk restores player health based on damage dealt and the Insta Kill powerup reduces the damage required to kill enemies to a non-existent amount, you also won't be getting any health back for kills.
It's then important to try and not let enemies damage you too much when an Insta Kill powerup is active during later waves when also the Black Eye skull is active, only regenerating health from melees. During later waves where your main source of health for staying alive is damaging enemies in large amounts, you'll want consider the consequences before picking up an Insta Kill powerup.
### Deadly enemies
**Escharum**
* Always prioritize killing Escharum if present on the map. He can kill you very quickly if you don't focus fire on him intentionally.
* Escharum has stages where he can't be damaged. These happen right after his shield breaks, when he is recharging the shield, and when he changes to the melee berserker mode. Don't try to damage him at these stages as he will take no damage.
**Jega 'Rdomnai**
* Invisible Elite that can surprise attack you and deal large amounts of damage to unaware players. Prioritize killing him, if you see him.
**Plasma Cannon Chieftains**
* Plasma fire depletes player shields very quickly and the Plasma Cannon is by far the most effective at that so prioritize killing these Brutes.
### Personal Score
Personal Score is what gets converted into XP. The ways to get personal score are:
* Round complete = 50
* Round begin = 25
* AI Kill = 20
* Assisting AI Kill = 10
The Score Attack powerup multiplies the points gained as well as score gained. One Score Attack powerup is worth a 2x multiplier, and multiple of them can be stacked to increase the multiplier always by 1x more.
### Solo strategy
Follow the [Progression from Gameplay Start](#progression-from-gameplay-start) guide and when you have an endgame loadout, keep focusing on yourself staying alive as a priority. If teammates die, first share points with them to see if they know what to do in order to get back in the game, but if they seem like deadweights, only use them as health boosts by reviving them if you get low on health.
### Team strategy
Follow the [Progression from Gameplay Start](#progression-from-gameplay-start) guide and make sure to communicate with your teammates. If teammates die, attempt to get them back into the game following the guide explained in [Getting teammates up to speed again](#getting-teammates-up-to-speed-again). The mode is more fun with teammates and it's an interesting challenge to try and get them back up to speed after dying instead of just focusing on yourself like in solo play with deadweight teammates.
#### Communication
Communicate with teammates if possible, as it will help you stay aware of what is happening on the map.
* Call out when picking up powerups such as Max Ammo (Mounted and Loaded), Nuke (Boom), Insta Kill (Spray and Pray) and Double Points (Score Attack) to know when and how to adjust your gameplay in the moment.
* Call out if you are about to die or need to refill ammo so teammates can focus on clearing the enemies around you.
***
#### Contributors
Okom
---
# Agent Instructions: Querying This Documentation
If you need additional information that is not directly available in this page, you can query the documentation dynamically by asking a question.
Perform an HTTP GET request on the current page URL with the `ask` query parameter:
```
GET https://the-scripters-guild-1.gitbook.io/tsg-forge-wiki/community/content/misc-content/survive-the-undead-strategy-guide.md?ask=
```
The question should be specific, self-contained, and written in natural language.
The response will contain a direct answer to the question and relevant excerpts and sources from the documentation.
Use this mechanism when the answer is not explicitly present in the current page, you need clarification or additional context, or you want to retrieve related documentation sections.
 When these are active and you're saving up to purchase something, it's recommended to go for the most expensive option first such as taking a chance at the 2500-point weapon upgrade or getting the maximum speed upgrade.
{% endhint %}
3. Purchase Damage 4/4
4. If you don't have any of the endgame or ideal base weapons, jump to step 1.
5. Purchase the Repulsor equipment.
* Allows you to push enemies away from you as well as escape tight situations by jumping over enemies on the maps that allow it.
6. Purchase Speed 4/4
7. If you don't have any of the endgame or ideal weapons (combos), jump to step 2.
{% hint style="info" %}
Purchase Max Ammo when about to run out of ammo.
{% endhint %}
#### Price decrease good weapon purchase strategy
If a temporary price decrease of 1/4 or 1/10 appears before you have at least one ideal weapon, immediately purchase a Disruptor or M392 Bandit off the wall–favoring the Disruptor–, and attempt upgrading it to get an "[alternative good weapon](#alternative-good-weapons)". These can substitute an [ideal weapon](#ideal-weapons-excluding-endgame) until you get an [endgame weapon](#endgame-items).
### Endgame
1. After wave 13 at the latest, Spend all your accumulated points on the Mystery Box and try to get an endgame base weapon (Heatwave / Pulse Carbine) depending on which ones you are missing. The first goal is to have both of them.
* Activate the Mystery Box while holding the worst weapon in your inventory, as that will be replaced.
* Keep trying until you get either one of the endgame base weapons. If you don't already have an endgame weapon, don't attempt to get both yet.
2. Upgrade the endgame base weapon at the 2500-point machine and try to get these combos:
* Pulse Carbine + Scatterbound Heatwave
* Heatwave + Purging Shock Rifle
3. If you don't have both of the endgame weapons, jump to step 1.
4. During intermission, purchase max ammo.
5. Purchase the Repulsor equipment back if it has been used up.
{% hint style="success" %}
This loadout is the "**endgame loadout**". You've achieved it if you have nothing more to spend your points on except more ammo, potential revives, repulsors and point shares. You should have the Heatwave + Purging Shock Rifle and Pulse Carbine + Scatterbound Heatwave combo weapons, max perks and a Repulsor.
{% endhint %}
#### Endgame round strategy
1. Save a Nuke powerup at the end of the previous intermission and pick it up after the Black Eye skull gets enabled.
* This will kill the Escharums that spawn at the beginning which are the biggest threat.
2. Always pick up Nuke powerups after the Black Eye skull gets enabled unless the round is about to end as you want to save it for the start of the next round for step 1.
3. Pick up Insta Kill powerups if there are still Escharums alive or you feel the need to help your teammates get faster kills.
* Be aware of the [negative effects the Insta Kill powerup has on health vampirism](#insta-kill-caution).
4. Pay attention to your ammo count and purchase Max Ammo when required.
5. Revive dead teammates if you need overshield quickly.
## Reviving
Info about when to revive teammates for the best results depending on the situation in the game.
### Reviving general
Only revive teammates if you have the Endgame loadout and points to spare, or if you need a health boost. As revived teammates get 30 seconds of 4x damage resistance, attempt to revive teammates 30 seconds before the round ends so they get extra time for gaining back their loadout.
* Reviving a teammate gives the reviver full health and half Overshield, which can save them in some tight situations.
* Teammates get revived automatically after a round has ended where they can also start getting their loadout back with no enemies attacking them.
* Usually it's very difficult for a teammate to build back their loadout when there's enemies attacking them, even when they have a 4x damage resistance trait for 30 seconds after spawning.
### Getting teammates up to speed again
If you or a teammate is revived, follow these steps to get the revived player back up to a state where they can contribute to the match. Keep in mind, it is very difficult to achieve this in later waves.
#### Before reviving
Make sure to share points to your teammates with the 2000-point share interface so they have a minimum of 5400 points saved up. And preferably more, such as 10400. These points will be used up quickly to get perks and an upgraded weapon after being revived.
#### During the current round
1. Revive all teammates approximately 30 seconds before you predict the round to end. Reviving a teammate gives them 30 seconds of 4x damage resistance which should keep them alive even if enemies are attacking them. If they survive until the intermission, they've now gained extra time to gather back their loadout.
2. The revived players must purchase Health 4/4 and a 500-point Calcine Disruptor off the wall, and upgrade the Disruptor at the 2500-point machine trying to get the Disruptor + Volatile Skewer combo weapon. This is where the extra points will come in handy as there is only a 25% chance of getting the Volatile Skewer combination.
#### Intermission 1
1. Alive players with the endgame loadout must share all of their points on the 2000-point Point Share interface to give the revived players enough points for the next steps.
2. Revived players must get ready in the area where the endgame player will be holding off the enemies in.
#### During the next wave
1. The revived players must stay close to the endgame player and shoot at far away enemies with the explosive Disruptor to aid the team and to keep themselves healed using the vampirism of Health 4/4.
#### Intermission 2 onwards
1. Alive players with the endgame loadout should share all of their points on the 2000-point Point Share interface to give the revived players enough points for them to progress.
2. Revived players must do the [Midgame](#midgame) and [Endgame](#endgame) steps until they have the endgame loadout.
3. Revived players must get ready in the area where the endgame player will be holding off the enemies in if the revived players don't have the endgame loadout.
## General tips
General tips to help you understand how to play the mode better and more efficiently.
### Best weapons
#### Endgame items
**Heatwave + Purging Shock Rifle**
* Shoots a 5-projectile Purging Shock Rifle bolt 5 times per trigger pull.
* A single shot shocks and stuns multiple enemies, making them stationary for a short period, which buys you valuable time with a lot of enemies attacking.
{% hint style="warning" %}
Only three shots per magazine, so keep an eye out for when you need to reload.
{% endhint %}
**Pulse Carbine + Scatterbound Heatwave**
* Shoots a 5-projectile tracking Heatwave shot 5 times per trigger pull.
* Shoot the ground to activate the Heatwave shot tracking towards enemies. This is the main strategy to shooting with this weapon.
* Scatterbound Heatwave projectiles pass through enemies and bounce off walls, dealing damage to multiple enemies with a single burst.
{% hint style="danger" %}
The bouncing shots can damage and kill the shooter unexpectedly.
{% endhint %}
**Max perks**
* Damage 4/4
* Health 4/4
* Speed 4/4
**Repulsor equipment**
* Allows you to push enemies away from you as well as escape tight situations by jumping over enemies on the maps that allow it.
* 5 charges per purchase.
#### Ideal weapons
**Plasma Pistol + Scatterbound Heatwave**
* Scatterbound Heatwave projectiles pass through enemies and bounce off walls, dealing damage to multiple enemies with a single burst.
* Overheats if shot too fast, which is often necessary.
* 114 semi-auto shots instead of 125 burst-fire shots compared to the Pulse Carbine + Scatterbound Heatwave combo.
{% hint style="danger" %}
The bouncing shots can damage and kill the shooter unexpectedly.
{% endhint %}
**Pulse Carbine + Convergence Bulldog**
* Kills single enemies fast.
* Ammo doesn't last long.
* Doesn't keep up with the pace required at later waves.
**Plasma Pistol + Convergence Bulldog**
* Kills single enemies fast.
* Ammo doesn't last long.
* Overheats if shot too fast, which is often necessary.
* Doesn't keep up with the pace required at later waves.
#### Alternative good weapons
**Disruptor + Volatile Skewer**
* 48 exploding Skewer shots which can one-shot enemies even in later waves. 12 shots per magazine.
* A potentially very low investment as it can be purchased off the wall for only 500 points, making the only randomness be the 25% chance of getting the right combo at the 2500-point upgrade machine, but getting bad luck will leave you with a useless weapon.
* Can easily carry a whole team to wave 14 if used cautiously.
* A good weapon to purchase right after being revived to keep yourself alive.
{% hint style="danger" %}
**Explosive projectile caution**
Explosive projectiles such as the Skewer, Rockets or Calcine Disruptor shot can damage the player easily which will unintentionally kill you when the enemy count starts becoming higher and they start appearing next to you.
The explosion can be survived point-blank if the shooter has Health 4/4 as they will also regenerate health from the damage dealt. Any more than one explosion nearby will very quickly kill the shooter.
{% endhint %}
**M392 Bandit + Volatile Skewer**
* 45 exploding Skewer shots which can one-shot enemies even in later waves. 15 shots per magazine.
* A potentially very low investment as it can be purchased off the wall for only 200 points, making the only randomness be the 25% chance of getting the right combo at the 2500-point upgrade machine, but getting bad luck will leave you with a useless weapon.
* Can easily carry a whole team to wave 14 if used cautiously.
* A good weapon to purchase right after being revived to keep yourself alive.
**Mutilator**
* Extremely powerful melee blast when Cowbell and Boom skulls are enabled.
* Melee blast can kill any AI they get sent into a wall at a high enough speed.
{% hint style="danger" %}
**Lag caution**
The melee blast of the Mutilator creates effects which seem to not get cleaned up properly. Eventually after meleeing for too long, the map's performance will drop to an unplayable state so this weapon is not ideal for long games.
{% endhint %}
#### Safest weapon to upgrade
The **Pulse Carbine** is the safest weapon to upgrade as it has only three variants:
* Scatterbound Heatwave
* Convergence Bulldog
* Unbound Plasma Pistol
{% hint style="info" %}
Unbound Plasma Pistol being the only bad variant. This means if you get a Pulse Carbine, you need a minimum of 5000 points to guarantee an ideal weapon.
{% endhint %}
#### Last chance to get an ideal weapon
You can survive to about wave 14 (first Escharum) with the default loadout of Mk50 Sidekick and MA40 AR, full perks and a Repulsor. After that, the enemy count and difficulty will become too much for the default weapons to handle. So if by wave 14 you haven't had good luck with the Mystery Box on getting an ideal weapon, you might just be out of luck.
#### Secret best weapon grant
By getting a kill with the Skewer + Unbound Plasma Pistol, a Heatwave + Purging Shock Rifle combo will be given to the killer. This can only feasibly be achieved by getting the Insta Kill powerup and then getting a kill with the Skewer combo.
When these are active and you're saving up to purchase something, it's recommended to go for the most expensive option first such as taking a chance at the 2500-point weapon upgrade or getting the maximum speed upgrade.
{% endhint %}
3. Purchase Damage 4/4
4. If you don't have any of the endgame or ideal base weapons, jump to step 1.
5. Purchase the Repulsor equipment.
* Allows you to push enemies away from you as well as escape tight situations by jumping over enemies on the maps that allow it.
6. Purchase Speed 4/4
7. If you don't have any of the endgame or ideal weapons (combos), jump to step 2.
{% hint style="info" %}
Purchase Max Ammo when about to run out of ammo.
{% endhint %}
#### Price decrease good weapon purchase strategy
If a temporary price decrease of 1/4 or 1/10 appears before you have at least one ideal weapon, immediately purchase a Disruptor or M392 Bandit off the wall–favoring the Disruptor–, and attempt upgrading it to get an "[alternative good weapon](#alternative-good-weapons)". These can substitute an [ideal weapon](#ideal-weapons-excluding-endgame) until you get an [endgame weapon](#endgame-items).
### Endgame
1. After wave 13 at the latest, Spend all your accumulated points on the Mystery Box and try to get an endgame base weapon (Heatwave / Pulse Carbine) depending on which ones you are missing. The first goal is to have both of them.
* Activate the Mystery Box while holding the worst weapon in your inventory, as that will be replaced.
* Keep trying until you get either one of the endgame base weapons. If you don't already have an endgame weapon, don't attempt to get both yet.
2. Upgrade the endgame base weapon at the 2500-point machine and try to get these combos:
* Pulse Carbine + Scatterbound Heatwave
* Heatwave + Purging Shock Rifle
3. If you don't have both of the endgame weapons, jump to step 1.
4. During intermission, purchase max ammo.
5. Purchase the Repulsor equipment back if it has been used up.
{% hint style="success" %}
This loadout is the "**endgame loadout**". You've achieved it if you have nothing more to spend your points on except more ammo, potential revives, repulsors and point shares. You should have the Heatwave + Purging Shock Rifle and Pulse Carbine + Scatterbound Heatwave combo weapons, max perks and a Repulsor.
{% endhint %}
#### Endgame round strategy
1. Save a Nuke powerup at the end of the previous intermission and pick it up after the Black Eye skull gets enabled.
* This will kill the Escharums that spawn at the beginning which are the biggest threat.
2. Always pick up Nuke powerups after the Black Eye skull gets enabled unless the round is about to end as you want to save it for the start of the next round for step 1.
3. Pick up Insta Kill powerups if there are still Escharums alive or you feel the need to help your teammates get faster kills.
* Be aware of the [negative effects the Insta Kill powerup has on health vampirism](#insta-kill-caution).
4. Pay attention to your ammo count and purchase Max Ammo when required.
5. Revive dead teammates if you need overshield quickly.
## Reviving
Info about when to revive teammates for the best results depending on the situation in the game.
### Reviving general
Only revive teammates if you have the Endgame loadout and points to spare, or if you need a health boost. As revived teammates get 30 seconds of 4x damage resistance, attempt to revive teammates 30 seconds before the round ends so they get extra time for gaining back their loadout.
* Reviving a teammate gives the reviver full health and half Overshield, which can save them in some tight situations.
* Teammates get revived automatically after a round has ended where they can also start getting their loadout back with no enemies attacking them.
* Usually it's very difficult for a teammate to build back their loadout when there's enemies attacking them, even when they have a 4x damage resistance trait for 30 seconds after spawning.
### Getting teammates up to speed again
If you or a teammate is revived, follow these steps to get the revived player back up to a state where they can contribute to the match. Keep in mind, it is very difficult to achieve this in later waves.
#### Before reviving
Make sure to share points to your teammates with the 2000-point share interface so they have a minimum of 5400 points saved up. And preferably more, such as 10400. These points will be used up quickly to get perks and an upgraded weapon after being revived.
#### During the current round
1. Revive all teammates approximately 30 seconds before you predict the round to end. Reviving a teammate gives them 30 seconds of 4x damage resistance which should keep them alive even if enemies are attacking them. If they survive until the intermission, they've now gained extra time to gather back their loadout.
2. The revived players must purchase Health 4/4 and a 500-point Calcine Disruptor off the wall, and upgrade the Disruptor at the 2500-point machine trying to get the Disruptor + Volatile Skewer combo weapon. This is where the extra points will come in handy as there is only a 25% chance of getting the Volatile Skewer combination.
#### Intermission 1
1. Alive players with the endgame loadout must share all of their points on the 2000-point Point Share interface to give the revived players enough points for the next steps.
2. Revived players must get ready in the area where the endgame player will be holding off the enemies in.
#### During the next wave
1. The revived players must stay close to the endgame player and shoot at far away enemies with the explosive Disruptor to aid the team and to keep themselves healed using the vampirism of Health 4/4.
#### Intermission 2 onwards
1. Alive players with the endgame loadout should share all of their points on the 2000-point Point Share interface to give the revived players enough points for them to progress.
2. Revived players must do the [Midgame](#midgame) and [Endgame](#endgame) steps until they have the endgame loadout.
3. Revived players must get ready in the area where the endgame player will be holding off the enemies in if the revived players don't have the endgame loadout.
## General tips
General tips to help you understand how to play the mode better and more efficiently.
### Best weapons
#### Endgame items
**Heatwave + Purging Shock Rifle**
* Shoots a 5-projectile Purging Shock Rifle bolt 5 times per trigger pull.
* A single shot shocks and stuns multiple enemies, making them stationary for a short period, which buys you valuable time with a lot of enemies attacking.
{% hint style="warning" %}
Only three shots per magazine, so keep an eye out for when you need to reload.
{% endhint %}
**Pulse Carbine + Scatterbound Heatwave**
* Shoots a 5-projectile tracking Heatwave shot 5 times per trigger pull.
* Shoot the ground to activate the Heatwave shot tracking towards enemies. This is the main strategy to shooting with this weapon.
* Scatterbound Heatwave projectiles pass through enemies and bounce off walls, dealing damage to multiple enemies with a single burst.
{% hint style="danger" %}
The bouncing shots can damage and kill the shooter unexpectedly.
{% endhint %}
**Max perks**
* Damage 4/4
* Health 4/4
* Speed 4/4
**Repulsor equipment**
* Allows you to push enemies away from you as well as escape tight situations by jumping over enemies on the maps that allow it.
* 5 charges per purchase.
#### Ideal weapons
**Plasma Pistol + Scatterbound Heatwave**
* Scatterbound Heatwave projectiles pass through enemies and bounce off walls, dealing damage to multiple enemies with a single burst.
* Overheats if shot too fast, which is often necessary.
* 114 semi-auto shots instead of 125 burst-fire shots compared to the Pulse Carbine + Scatterbound Heatwave combo.
{% hint style="danger" %}
The bouncing shots can damage and kill the shooter unexpectedly.
{% endhint %}
**Pulse Carbine + Convergence Bulldog**
* Kills single enemies fast.
* Ammo doesn't last long.
* Doesn't keep up with the pace required at later waves.
**Plasma Pistol + Convergence Bulldog**
* Kills single enemies fast.
* Ammo doesn't last long.
* Overheats if shot too fast, which is often necessary.
* Doesn't keep up with the pace required at later waves.
#### Alternative good weapons
**Disruptor + Volatile Skewer**
* 48 exploding Skewer shots which can one-shot enemies even in later waves. 12 shots per magazine.
* A potentially very low investment as it can be purchased off the wall for only 500 points, making the only randomness be the 25% chance of getting the right combo at the 2500-point upgrade machine, but getting bad luck will leave you with a useless weapon.
* Can easily carry a whole team to wave 14 if used cautiously.
* A good weapon to purchase right after being revived to keep yourself alive.
{% hint style="danger" %}
**Explosive projectile caution**
Explosive projectiles such as the Skewer, Rockets or Calcine Disruptor shot can damage the player easily which will unintentionally kill you when the enemy count starts becoming higher and they start appearing next to you.
The explosion can be survived point-blank if the shooter has Health 4/4 as they will also regenerate health from the damage dealt. Any more than one explosion nearby will very quickly kill the shooter.
{% endhint %}
**M392 Bandit + Volatile Skewer**
* 45 exploding Skewer shots which can one-shot enemies even in later waves. 15 shots per magazine.
* A potentially very low investment as it can be purchased off the wall for only 200 points, making the only randomness be the 25% chance of getting the right combo at the 2500-point upgrade machine, but getting bad luck will leave you with a useless weapon.
* Can easily carry a whole team to wave 14 if used cautiously.
* A good weapon to purchase right after being revived to keep yourself alive.
**Mutilator**
* Extremely powerful melee blast when Cowbell and Boom skulls are enabled.
* Melee blast can kill any AI they get sent into a wall at a high enough speed.
{% hint style="danger" %}
**Lag caution**
The melee blast of the Mutilator creates effects which seem to not get cleaned up properly. Eventually after meleeing for too long, the map's performance will drop to an unplayable state so this weapon is not ideal for long games.
{% endhint %}
#### Safest weapon to upgrade
The **Pulse Carbine** is the safest weapon to upgrade as it has only three variants:
* Scatterbound Heatwave
* Convergence Bulldog
* Unbound Plasma Pistol
{% hint style="info" %}
Unbound Plasma Pistol being the only bad variant. This means if you get a Pulse Carbine, you need a minimum of 5000 points to guarantee an ideal weapon.
{% endhint %}
#### Last chance to get an ideal weapon
You can survive to about wave 14 (first Escharum) with the default loadout of Mk50 Sidekick and MA40 AR, full perks and a Repulsor. After that, the enemy count and difficulty will become too much for the default weapons to handle. So if by wave 14 you haven't had good luck with the Mystery Box on getting an ideal weapon, you might just be out of luck.
#### Secret best weapon grant
By getting a kill with the Skewer + Unbound Plasma Pistol, a Heatwave + Purging Shock Rifle combo will be given to the killer. This can only feasibly be achieved by getting the Insta Kill powerup and then getting a kill with the Skewer combo.